As the residency draws to a close, it’s a good time to share images of some of the prototypes and samples that I created alongside undertaking my other research. I always like to document my work and also to be in a position to provide high quality images where necessary, and I can’t do that with the snaps that I take myself. So instead I rely on my wonderful photographer and friend Robyn Manning. Before finishing the residency I took some of the samples and prototypes over to her studio to photograph, and here are the results.
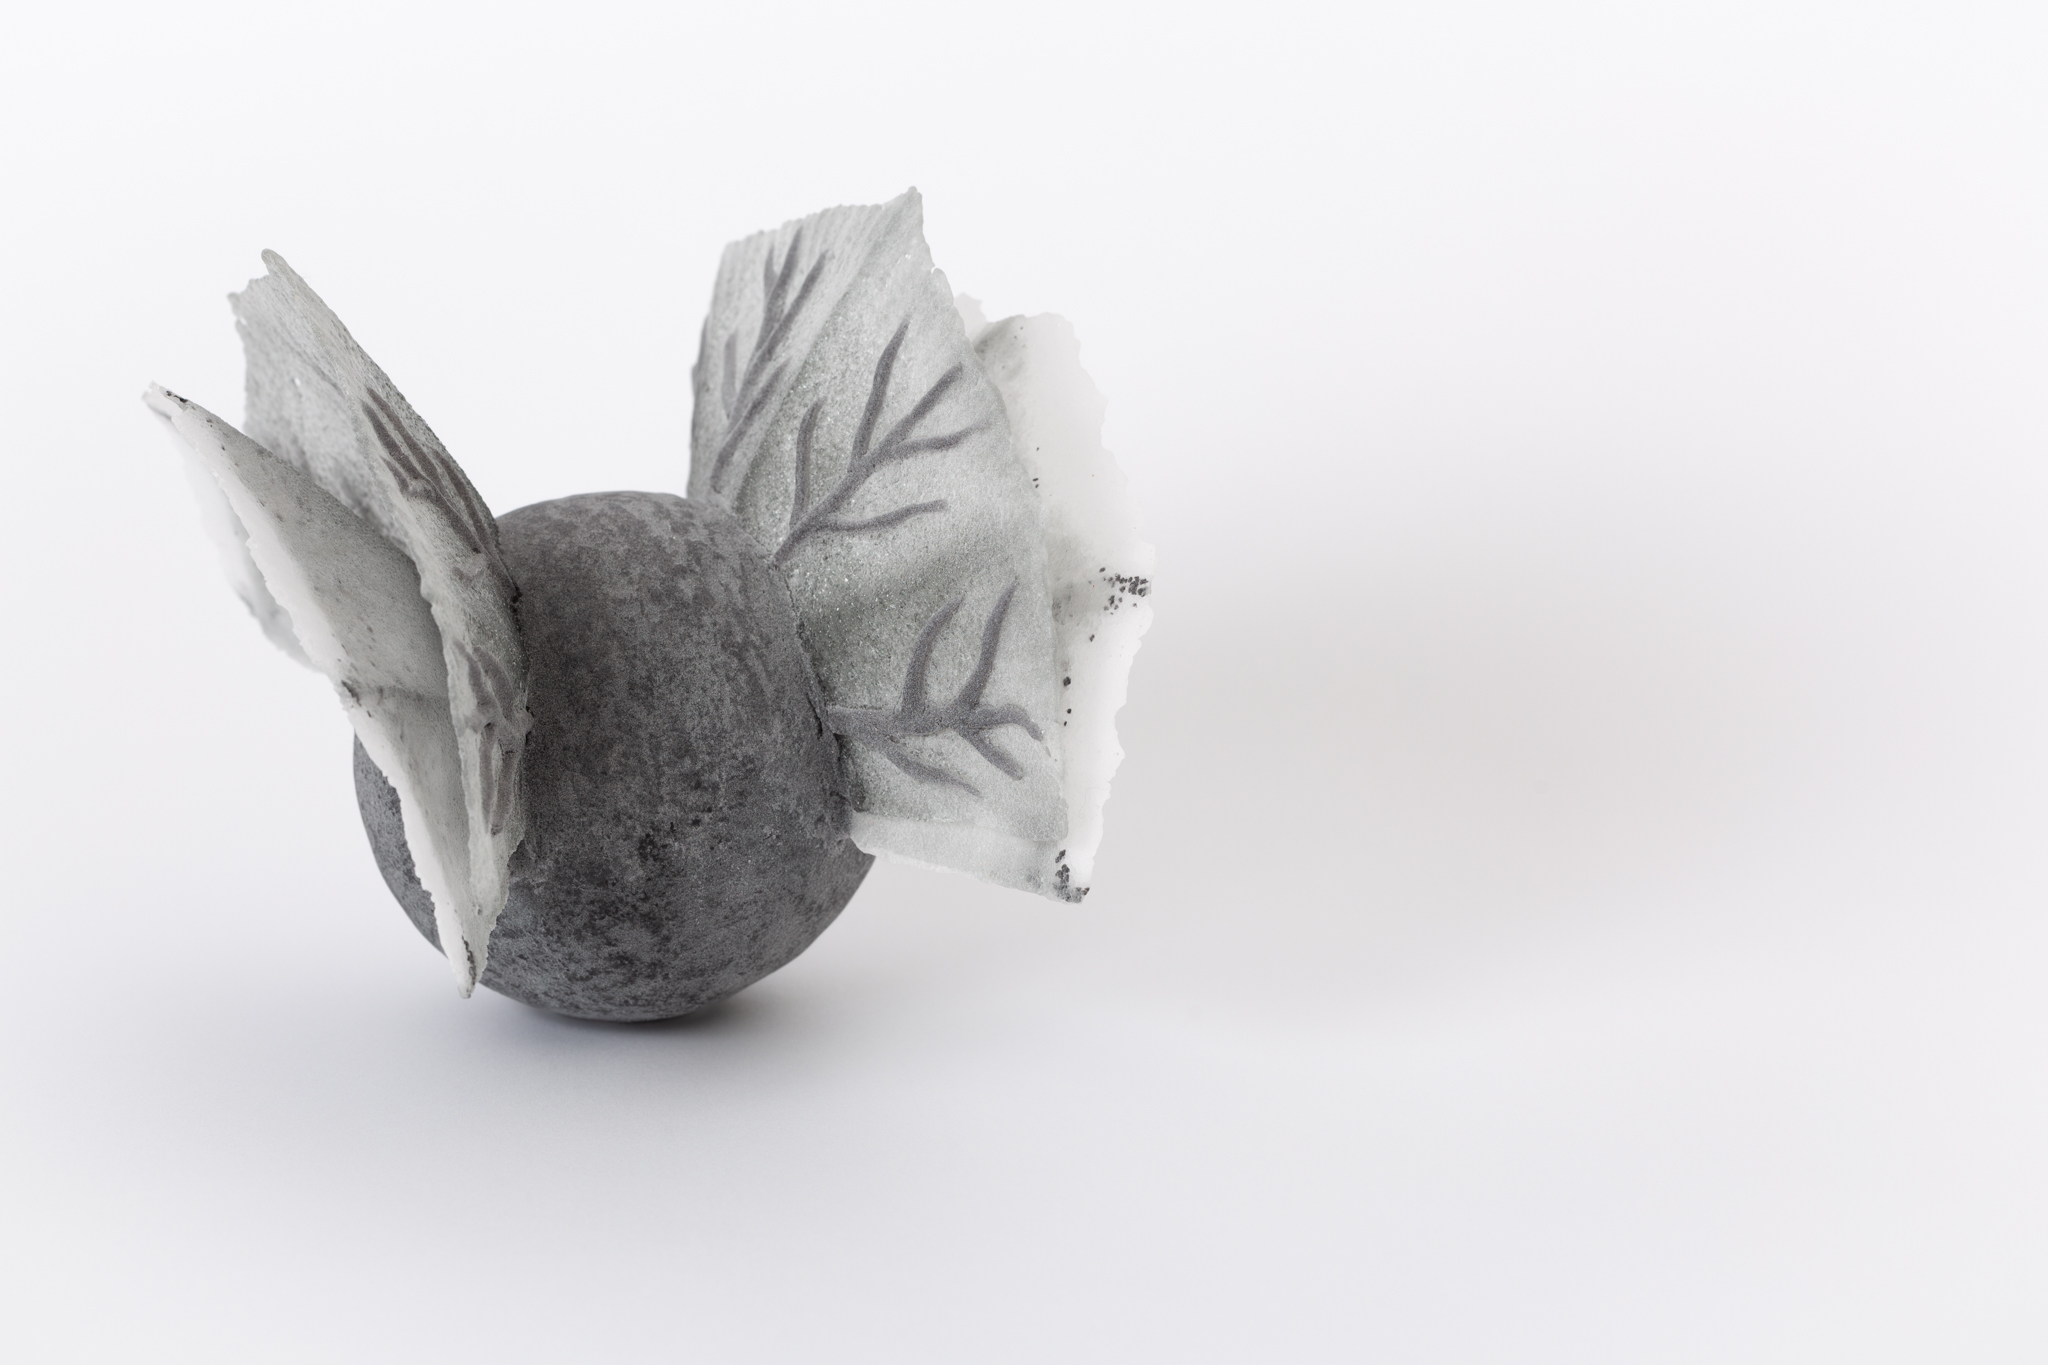
When thinking about all the metaphors and how my artwork might develop I was immediately struck by the metaphor of cancer cells developing ‘wings’ as they transition from single tumours to metastatic disease. I knew it would be technically challenging making a piece in glass that reflected to any degree what I was visualising in my mind’s eye, but I thought I should try and at least capture something of the feeling by ‘going for it’ and seeing what I could achieve.
To understand the challenge, it’s necessary to share a little about how glass behaves when it’s heated. To make my pieces in ‘pate de verre’ (literally paste of glass), i make a paste from crushed glass or glass powder and apply it to a mould. This is the process you can track looking at my previous post about making ‘cells’. When the glass is then heated in a kiln, the powder or crushed glass fuses together in the heat to make a single surface. What holds it in position is a delicate balance between the level of heat and the structure of the mould. Too much heat and it will drop off the mould, too little and it won’t fuse and will return to dust.
When trying to create ‘wings’, if they are freestanding, they will sag in the heat and eventually drop onto the nearest surface, which might be the body of the cell or might be the shelf of the kiln. Luckily, earlier in the year I had learned a firing technique of firing pieces in a bowl of powder (sand or aluminium oxide) which could support the wings while the glass fused. For this i am grateful to the amazing glass artist Saman Kalantari. Here an image of some pieces I created by combining this firing technique with my own method of pate de verre.
However, what I wanted to achieve with this project was more ambitious technically in terms of the scale and form of the wings in relation to the ‘body’. My initial sketch for the piece is below.
As I’m not super comfortable in two dimensions I went on to make a 3D maquette out of polystyrene and wire mesh. You can follow the whole process through the flow chart below…
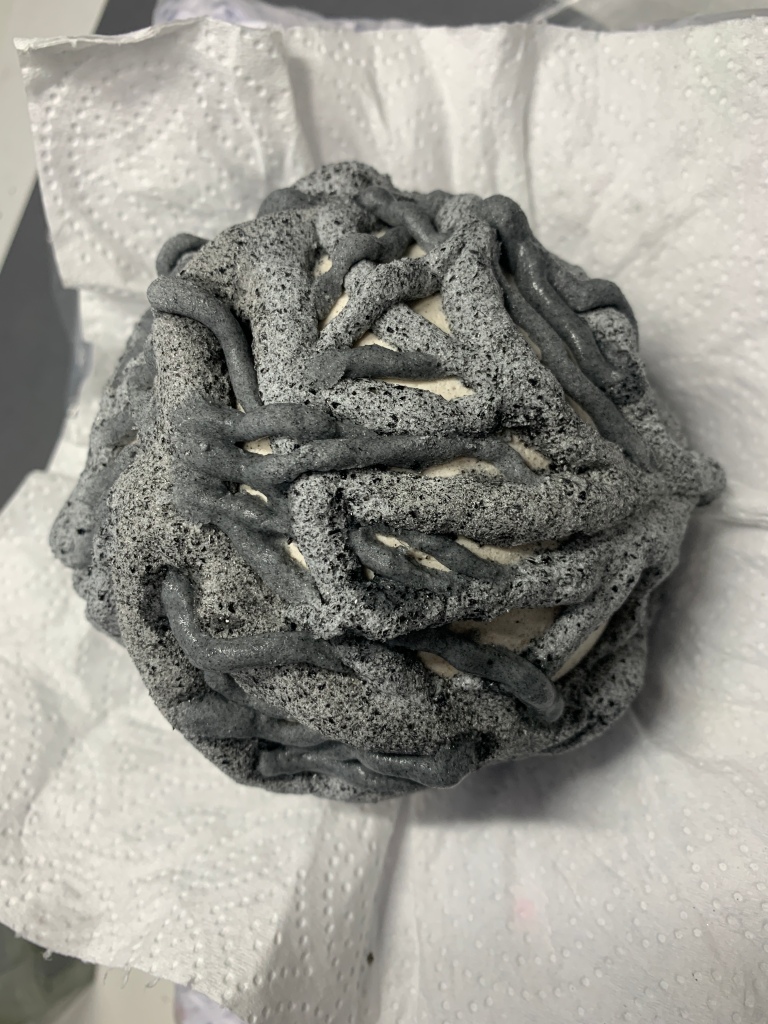
THe chart makes it look relatively straightforward, but I can reveal that it was not! Getting the firing right required multiple attempts, with the piece going into the kiln in one way or another about 5 times. Luckily, I wanted the piece to look a bit ‘distressed’ as this is entirely in keeping with the ideas of the cells that emerge with ‘with wings’ from the ‘cell graveyard’ within a tumour. The cell that emerged was a bit battered from all it had been through, but proved that it is possible to make a double-winged entity where the wings have a significant area in relation to the size of the ‘body’ of the piece.
Here is an image of the piece once I had brushed it off and done a bit of coldworking - that is, finishing edges and surfaces with grinding and polishing tools.
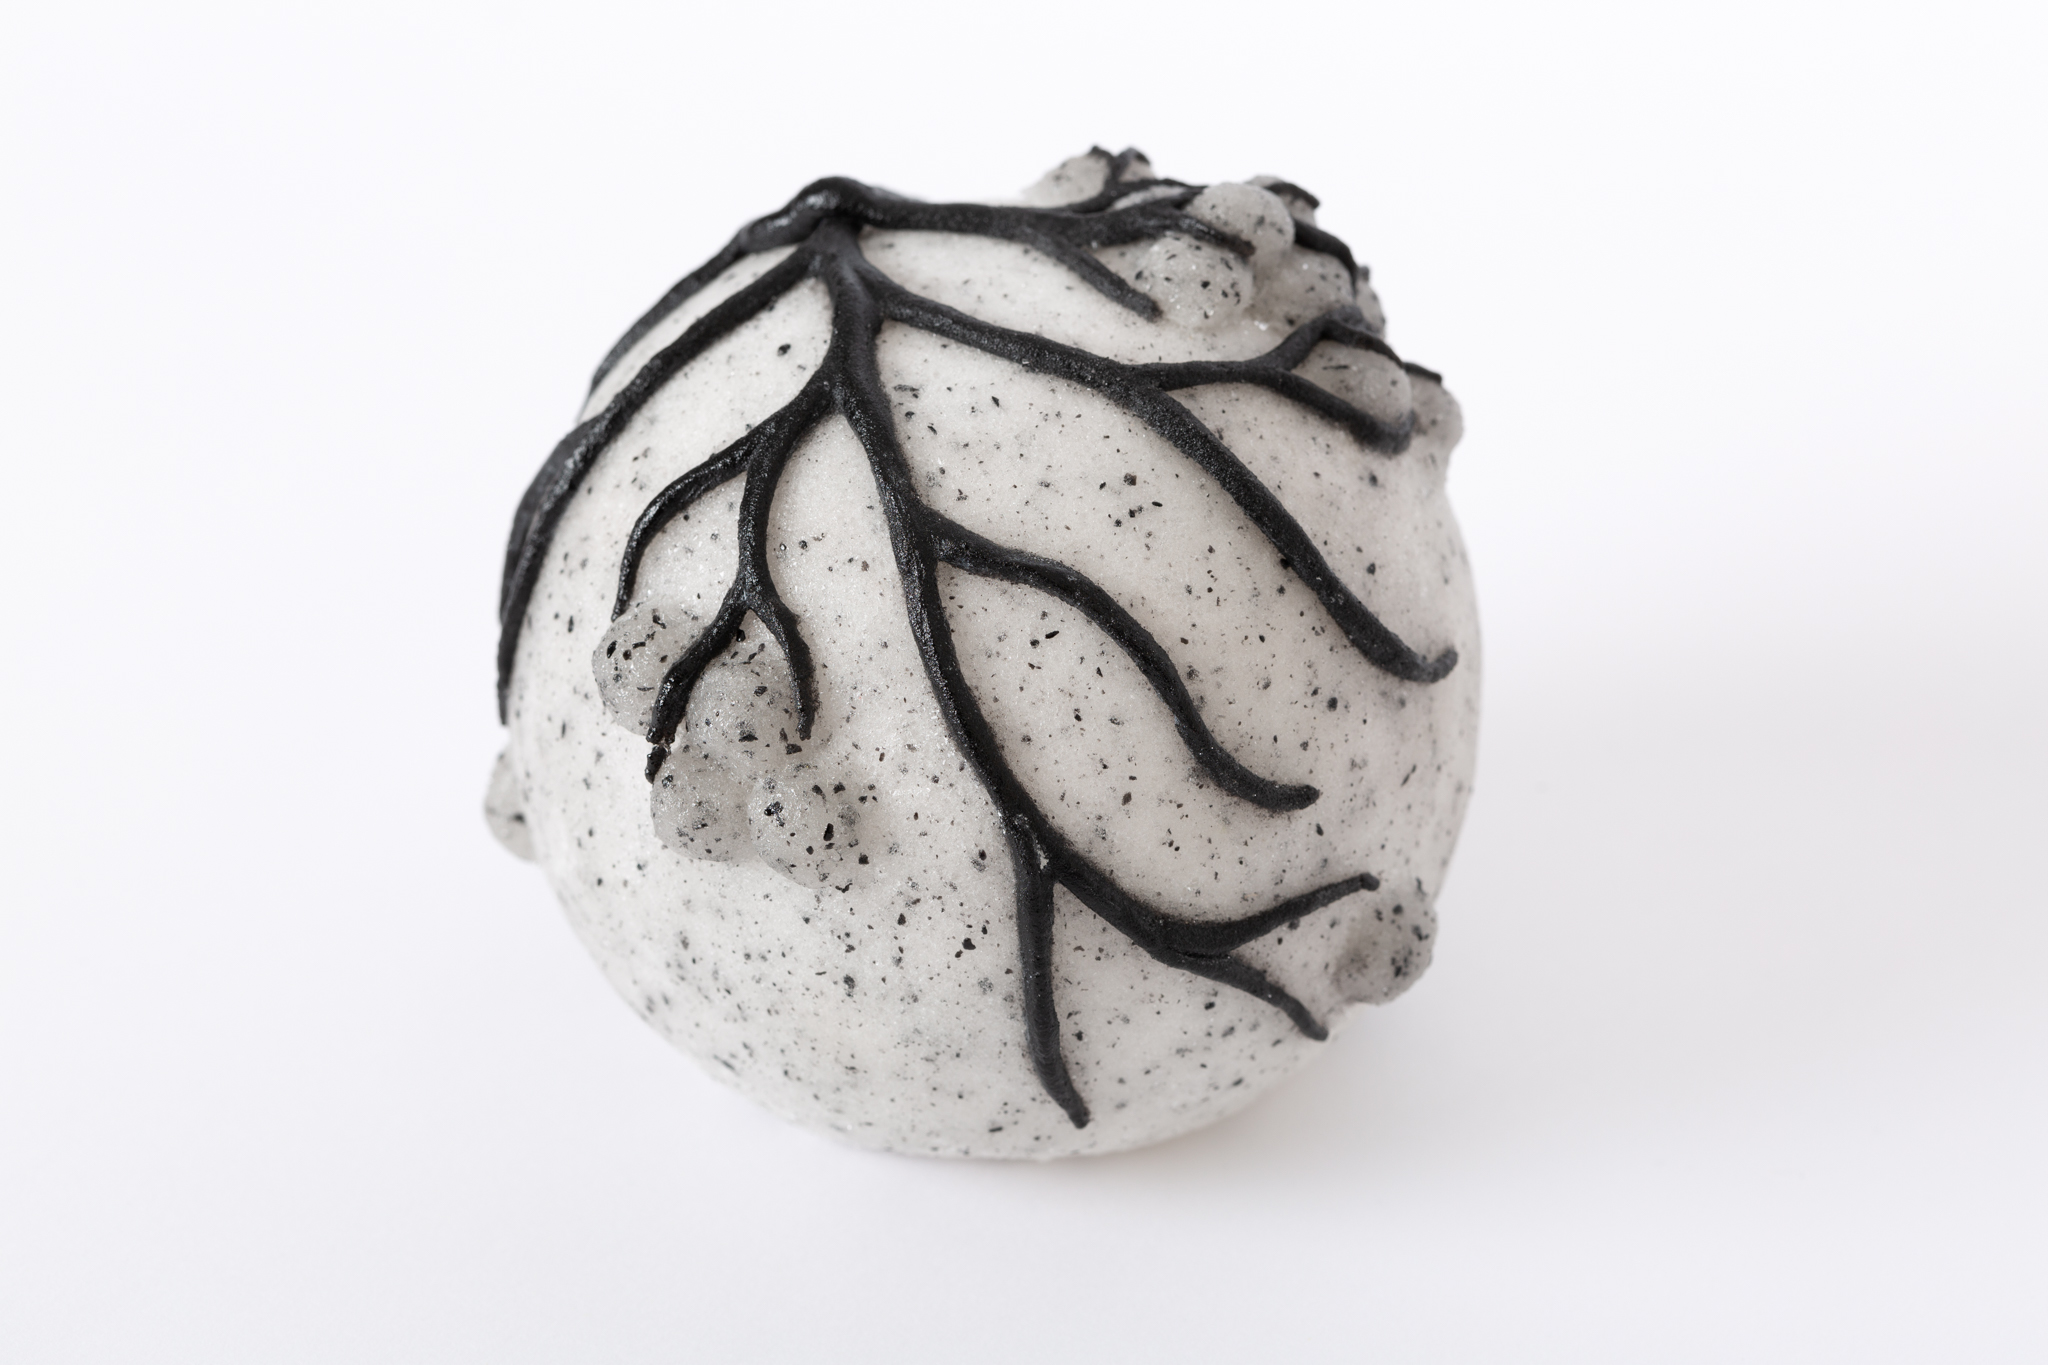
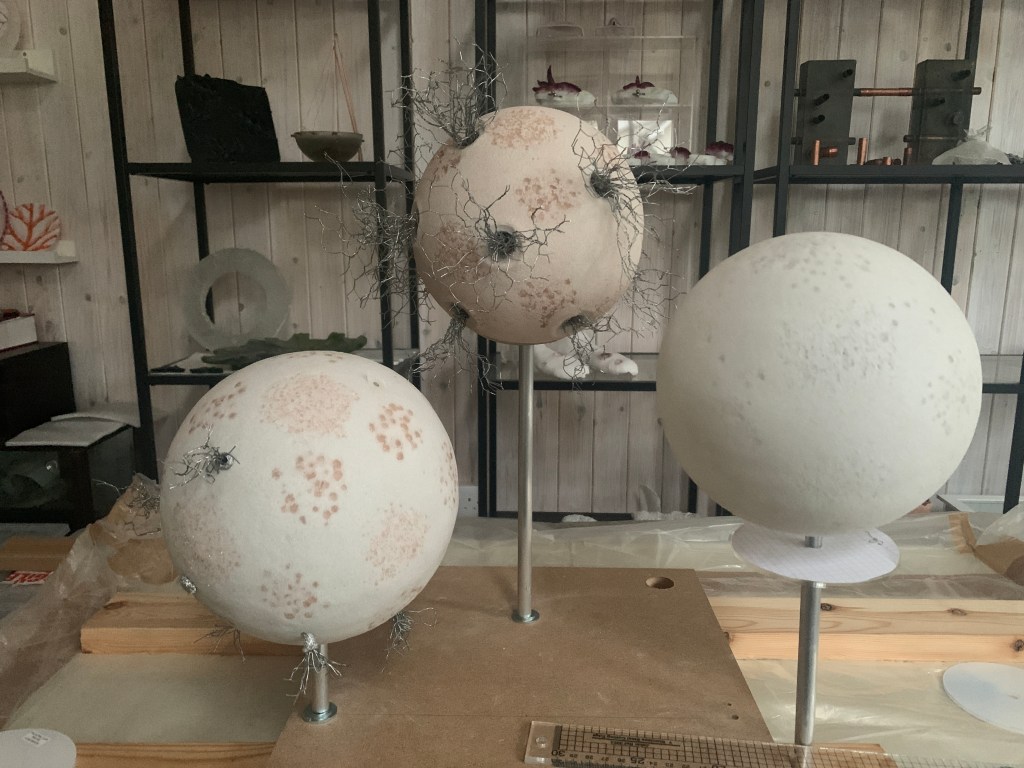
After making the ‘cell’ structured from ‘veins’ I tried a number of different approaches to applying vein-like patterns to the exterior of a cell structure. I wanted to try degrees of visual order or chaos, and to see how these effects looked in different tones – dark veins on pale background, pale veins on pale background, dark on dark etc. I also wanted to assess impact of variations in size. So i made a selection of other ‘dendritic’ cells to compare with the initial cell described in a previous post. Here are some images of the making process for these.
And here are some images of the finished cells
I also made a small sample of a potential flat panel featuring an image of a tangle of blood vessels with gilding added, representing something of a golden thread or pathway through the tangle. I went on to make three larger sample panels which became a series of three with the gilding ‘moving through’ the vein tangle and spreading across the panel.
Panels waiting to be fired for the first time before gilding
Working with different approaches to some of the same theme has felt very productive for me. I have got to assess creatively and technically which types of surface are most successful and most expressive. I also plan to gather some feedback from others as i begin to share the work to get a sense of what the different patterning and finishes convey to those who see them…
I have already written about my interest in angiogenesis as a process that forms part of the cancer ecosystem and that potentially functions as a metaphor in the LCH context (see Concepts and Metaphors (5)). It has been fascinating to look at images of the blood vessels that grow to support tumour growth. and equally interesting to see how clearly related the visual qualities of blood vessels from a tumour are to growth patterns observable around the LCH site, such as amongst the trees and ivy growing near the demokition site and close to the Royal Marsden.
On the left, an image of tumour blood vessels. Centre and right, images of trees and ivy on the LCH site.
These types of images were my starting point for making some glass samples and experimenting with using dendritic growth patterns as both structure for glass cells and for decoration.
And so, angiogenesis has emerged as a focus for my initial creative exploration. I have long been interested in creating vein-like, dendritic structures and decoration, so this is an evolution rather than complete change of direction for my own creative practice.
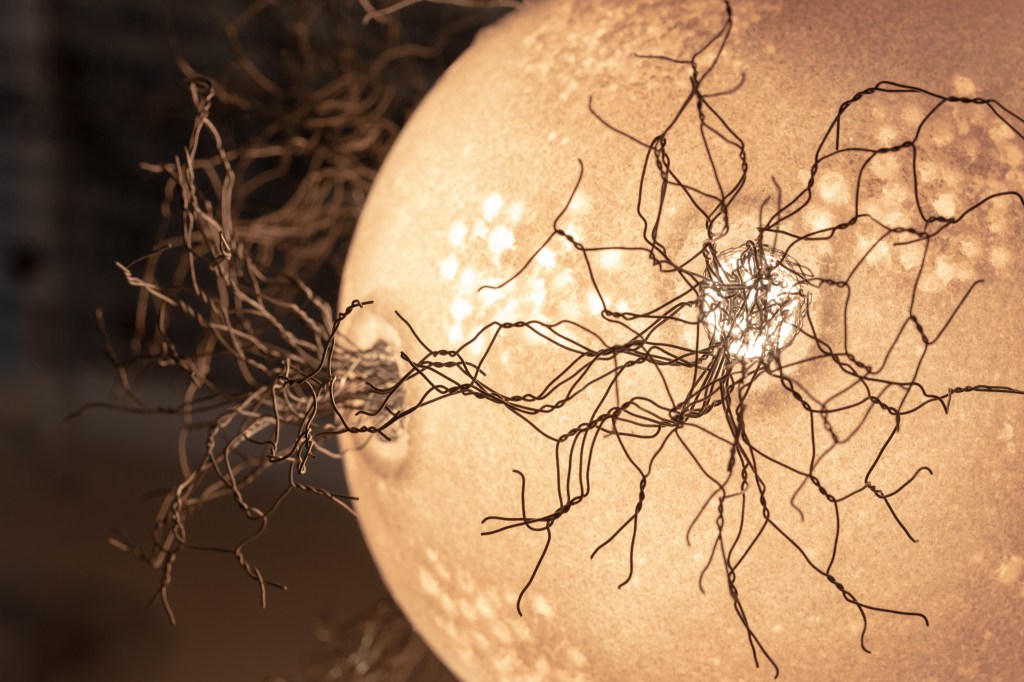
I decided to start with the basic form of the sphere, partly because i enjoy working with that form, and partly because to me the sphere is suggestive of the shape of a cell (regardless of the fact that not all cells are spherical).
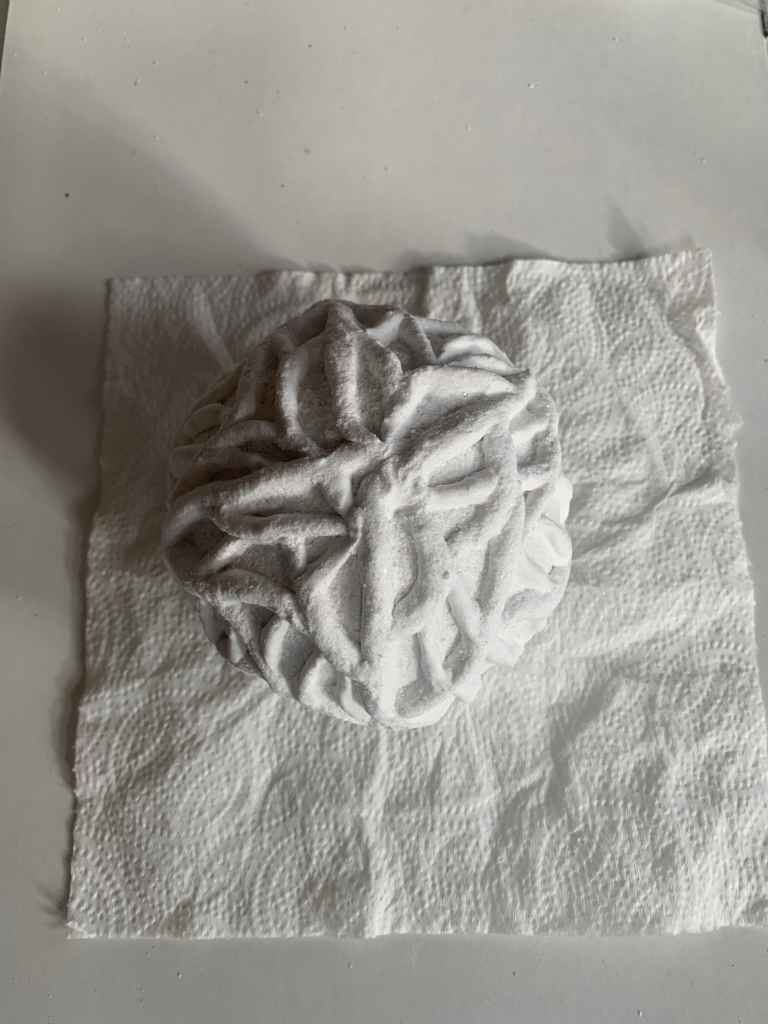
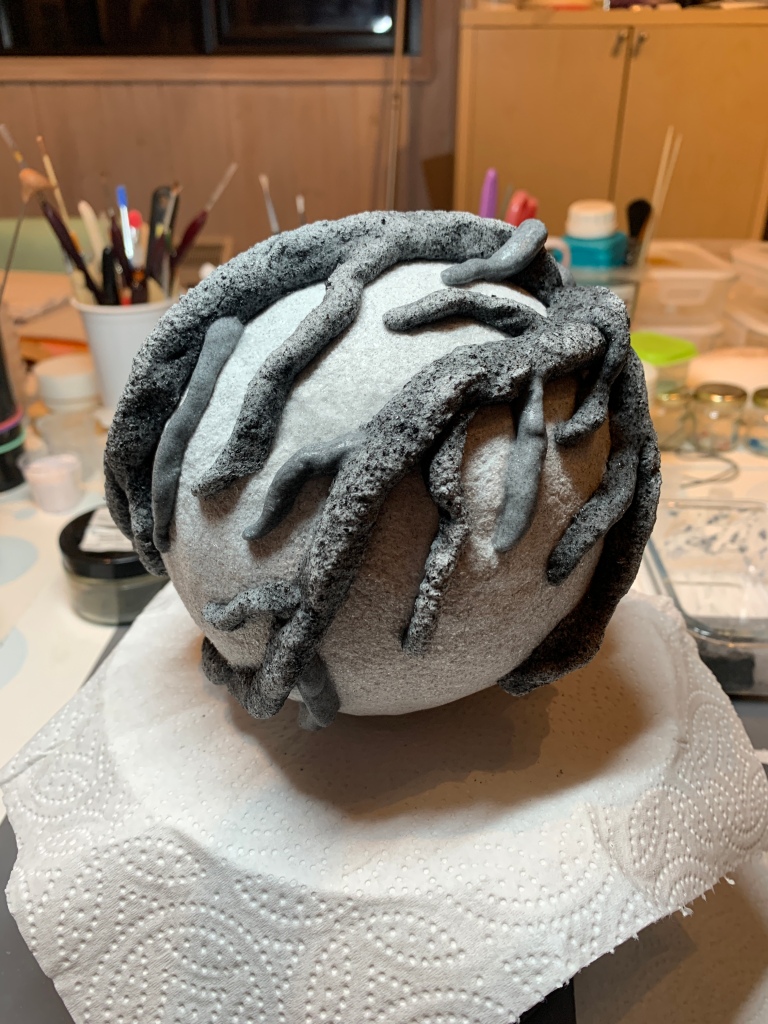
My first idea was to try and construct the form as a whole just from ‘veins’ to see if i could form the cell structure that way. The following images track my progress along that path.
The first line of images above shows the initial ‘veins’ of glass paste that build the structure of the glass over the mould. The second line of images shows a later stage where more veins have been added and interwoven. I was aiming at an outcome that was somewhat evocative of the growth patterns in the images of the tumour blood vessels and also the tree and ivy growth.
In the kiln before firing
This is how the piece looked when it went into the kiln for firing. Glass paste shrinks considerably when it’s fired, so I was expecting the veins to be more slender when they emerged. From the technical perspective I was concerned about whether the structure would be strong enough and stable when it emerged as the shrinkage can also cause the glass to pull away and disconnect or to crack and break. From a creative perspective I wanted to see how the veins looked after firing to see if they (still) evoked the tumour and growth patterns.
Post firing with the mould still insideAfter removing the mould
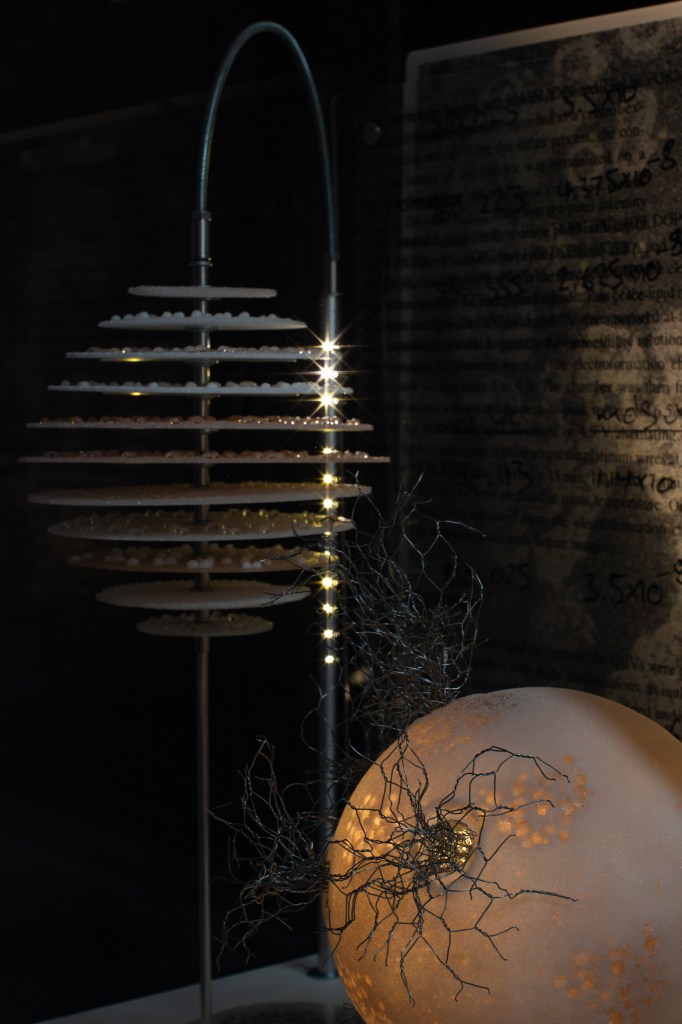
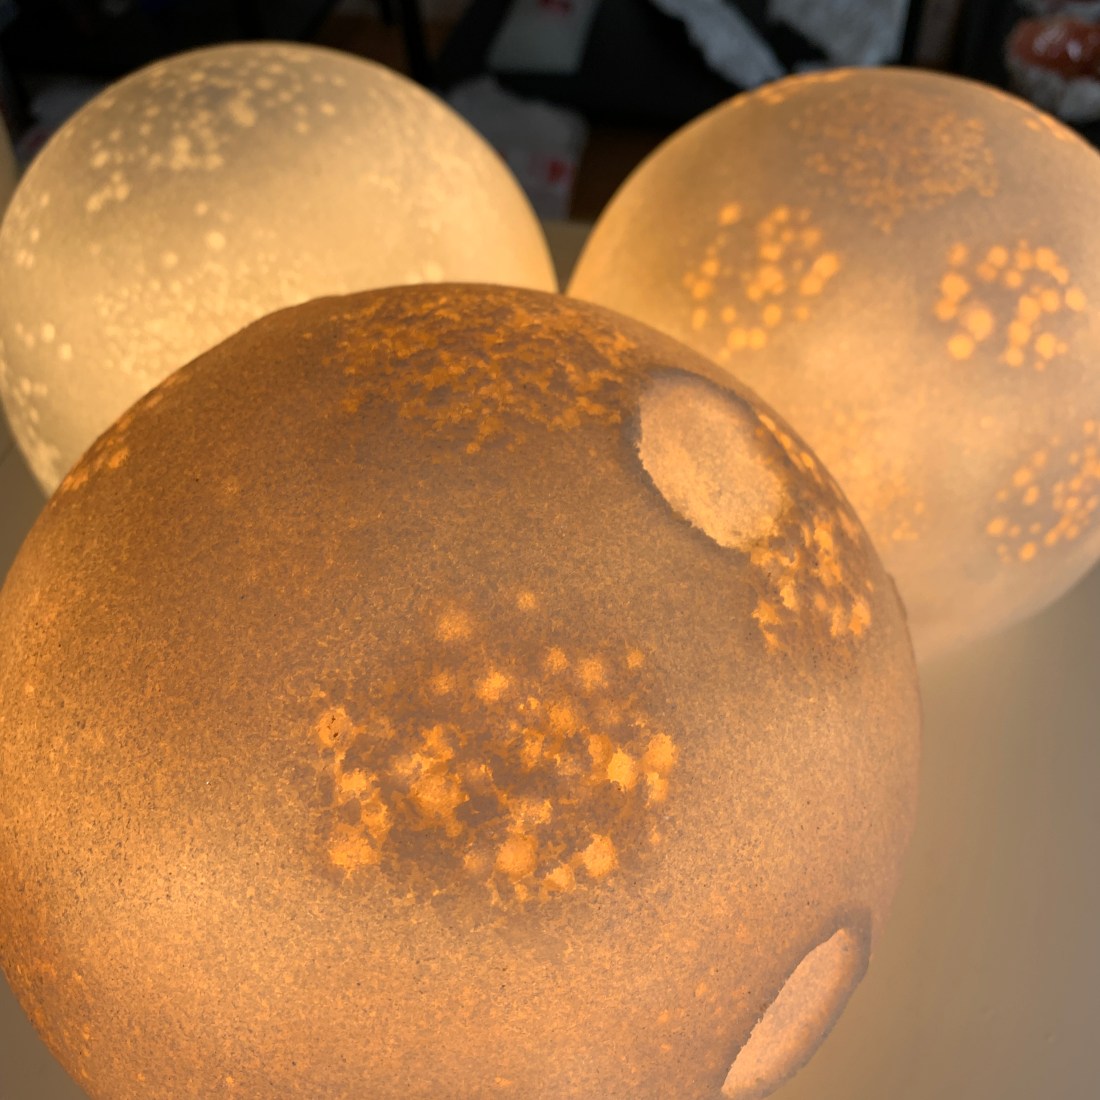
This is how the finished ‘cell’ looks below with a bit of directional lighting. Luckily the firing went well and the piece emerged intact. As a sample or prototype I am very happy with how it’s turned out. It was very time consuming to make – more so than the samples of dendritic cells that i made subsequently, as the lack of underlying structure for the veins made the whole thing more complex. I also felt that the shrinkage of the glass made the piece slightly less evocative than it was pre-firing, but to some extent this could be changed in subsequent pieces.
One thing I should add at this point is that this – as a sample or prototype – is not intended to be a standalone piece. My intention was that it could be a model for a component of a composition of cells, potentially some in light, some in shadow. I knew also that I wanted to experiment with working in a pale colour, probably white, and making vein structures that were also more ordered, less chatotic. So that’s what I did next.
A few weeks ago when I was over at the Royal Marsden I met up with the Arts Officer there, who is both creating an amazing arts programme for hospital patients and also curating and refreshing all the artwork that is displayed around the hospital. I’ll pop up another post with some images from our tour around the hospital at some point soon, but I wanted to record here the ideas we had about involving some of the clinicians who could give a perspective on the idea of the Ecosystem of the London Cancer Hub. The idea of running a workshop for Research Nurses emerged as they are central to the idea of ‘bench to bedside’, which is the intention to create a smooth transition to and from between research and clinical trials or treatments, an idea that feels to be at the heart of the idea of a London Cancer Hub ecosystem. You can find out more about Research Nurses here and about an example of ‘bench to bedside’ here.
After some drafting and conversation here’s the flyer that resulted. I hope it will be a fun experience for some research nurses as well as an opportunity to find out something of their perspective on the ecosystem. The flyer has gone out, and though as yet there are no bookings I am hopeful there’ll be some interest a bit nearer the time!
Today’s ideas are all about routes, travelling, and journeying. Some seem to be so commonplace that they are not really thought about as metaphors at all. And I’m also beginning to pick out metaphors that are more clearly ‘metaphorical’ and used deliberately because of their non-scientific connotations.
Concepts in a cancer context
Many of my descriptions about how these relate to cancer are drawn from a fascinating conversation with the Biology of Childhood Leukaemia team in a discussion about the role of gene TP53 in regulating cancer and the effects of hypoxia (lack of oxygen) on cancer evolution.
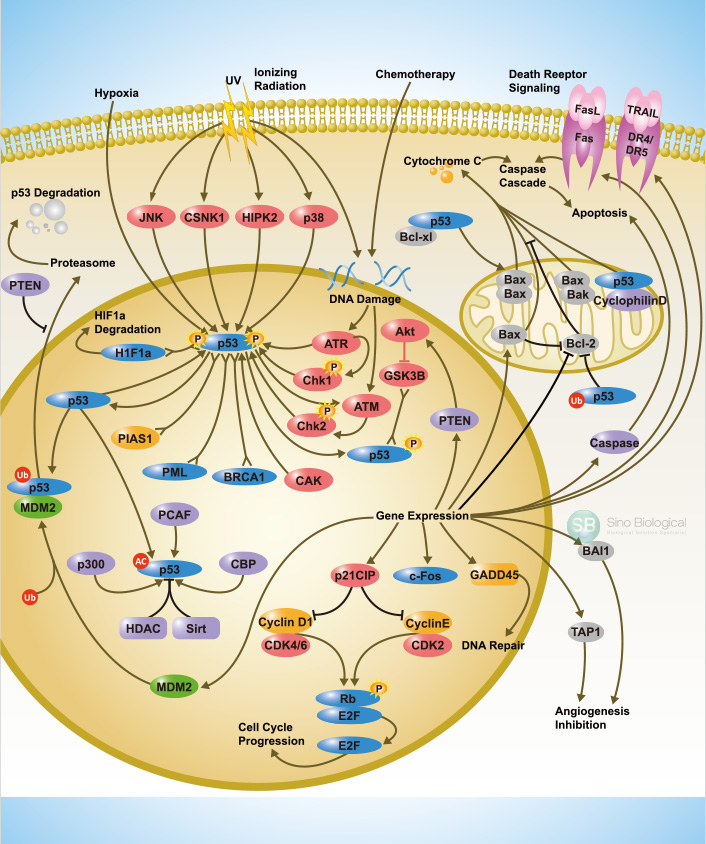
“Pathways”
Steps in the process that govern a cellular system. For example, the TP53 pathway is the one that a cell goes through in terms of whether it is ‘allowed’ to replicate, is sent to be fixed or if it is earmarked to die.
An example of how a pathway is illustrated – this one centred on the P53 protein generated by the TP53 gene
“Gateway”
On a pathway there can be a gateway, such as the gateway that cells go through on the TP53 pathway, for example, in order to know if they should go forward to replicate or stop and die. This is a gateway that can become very ineffective in cancer – cancer cells do not die in the same way as normal cells – and may be related to changes or mutations of the TP53 gene.
“Bottleneck”
A point at which many cells fail and a few pass through such as in the toxic environment at the centre of a tumour where the majority of cells die but one or two may replicate with mutations that allow them to survive.
“Signalling”
How cancer cells communicate with surrounding cells. Eg, they can signal to the body to grow more blood vessels to a tumour. Signals can be proximal (ie next door with surface proteins) or longer range chemical (eg with hormones etc).
“Rite of Passage”
This is a more specific metaphor drawn from one of the papers of the Childhood Leukemias Team. This metaphor represents the point of no return in cancer. Specifically, the ‘rite of passage’ in the paper refers to the the point at which the TP53 mutation allows cells to transition through EMT and launch themselves into the rest of the body. THis is the point where cancer metastasises, after which the hopes of ‘cure’ are drastically diminished. A rite of passage indeed.
How all this relates to the London Cancer Hub
While talking to ICR researchers the idea of spatial movement came up frequently, both in terms of their research and about their personal movements around the site and around London. While it seemed to me that in terms of the site, they concentrated on the ICR part of the campus, several mentioned how walking past or through hospital buildings either as part of their journey to work, or to collect samples or meet with clinicians, reminded them of the ultimate purposes of their work. This was especially true when they cam into direct contact with patients, even if this was just seeing or passing them on their own pathways,
Movement around the LCH was not the only example of establishing pathways in a very literal sense. Several researchers also told me about their regularly trodden routes around London as part of their work. For example, one scientist talked about how at one stage in her work she was travelling frequently – occasionally daily – on a circuit between the Sutton ICR, the Chelsea ICR and the Imperial College campus at White City. Interestingly, her work was heavily focused on identifying the spatial arrangements of different cell types in tumours, which are ‘barcoded’ to keep track of their position. We chatted about the possibilities of tracking the movements of researchers in a similar way. I would love to track some staff across the site and see what visual mappings came out of the exercise. I’ll be posting more about the site, its history and pathways through it in a forthcoming post…
And the ‘rite of passage’ for the LCH? I could interpret that in so many ways, so I am going to hold back and see what else emerges,
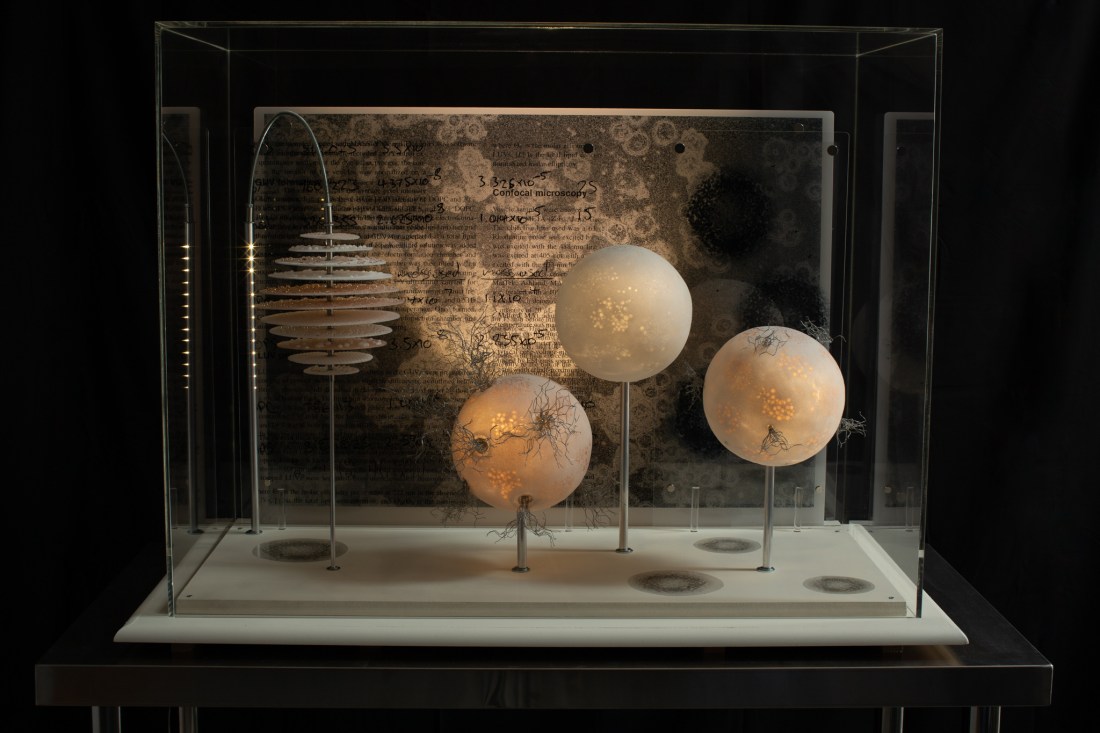
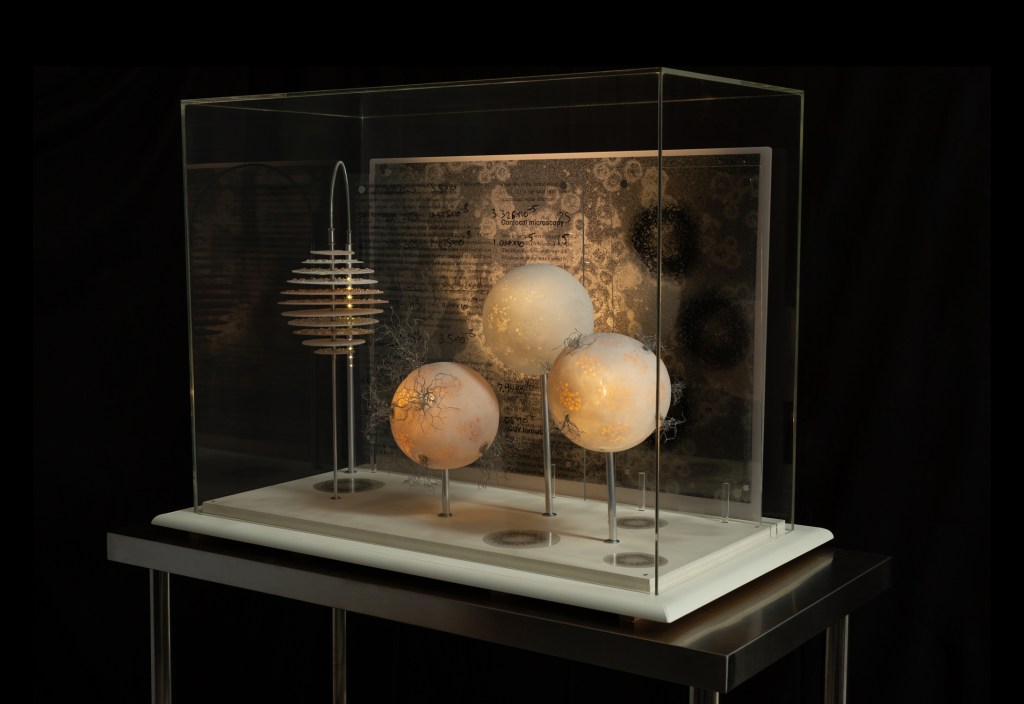
The final piece, called Diorama 1, was finished at the end of 2020, but because of the coronavirus situation it has not yet been possible to take the artwork to Leeds to be displayed at St James’ Hospital. However, we decided it would be good to start sharing online rather than waiting until it goes on physical display, so here is a selection of pictures….
Images are by Robyn Manning Photography, who can be found on Instagram as @robyn_manning_photos. I am extremely grateful to Robyn for her patience in setting up everything so that the Diorama looks its best – thanks Robyn!
I thought it might also be interesting for people to see an example of the transition of lighting of the vesicles – this video was taken on my phone, so don’t blame Robyn for the ‘blown out’ exposure of the illuminated vesicles….
A timelapse video showing one variation of the lighting transitions from a full day
From quite an early conversation with the team, the intention had been for the vesicles to be lit up, but what was less clear was how this was to be achieved. We had discussed how it would be great for the lighting to change throughout the day, both to compensate for the piece being placed in a position without natural light (the CRF waiting areas are not naturally lit) and also to add interest to the piece.
I liked the idea of internal lighting and a transition across the day, finding it wonderfully consistent with the idea of a traditional diorama, as these often included their own interior lighting to draw in the viewer. One of the big questions for me, though, was how to programme the timings on the lighting, not being particularly competent in that area.
Early experiments with lighting
I did briefly learn how to use Arduinos, but it was a while ago and I would have had to start again from scratch to make it work. Also, all the restrictions of Covid made it harder to contemplate outsourcing this part of the project, as did the available budget. The answer came in the surprising form of aquarium controllers. These controllers are designed to make sure that aquarium fish are not shocked by the sudden switching on of the lights in the morning or the switching off in the evening and allow you to programme a series of sunrises and sunsets across the day.
Constructing the lighting elements
Constructing the stands so that the glass elements were lit internally was initially a case of testing lots of different types of 12V lights of the kind often used for caravans or countertops. Eventually I found some that I was happy with and set about mounting them so that the lights would be correctly positioned within the vesicles. Lots of cases of trial and error as I went along and once again aquarium supplies came to the rescue, this time in the form of clear flexible tubing that holds the lights in the right place.
Finally, after wiring, soldering and finishing the full construction of the piece, I could programme the lights in the vesicles. They can each be set to gradually come on at different intensities across the day to draw attention to different parts of the diorama.
Meanwhile, another challenge was to light the Z Stack. I achieved this through feeding an LED strip through the length of the stand I had created for the stack, with holes strategically drilled to let light through. For me, this layered lighting enhances the analogy of the Z Stack itself, and how the microscopy and computation processes build a whole form from slices of data.
The final lighting for the Z Stack
To see a timelapse of one lighting scheme for the finished artwork, have a look at a forthcoming post of images of the final piece!
As soon as the idea of a diorama came to mind, I felt that the backdrop should reference the research project itself, not just the scientific concepts and phenomena that were the subject of the research. When I discussed this with the team, they were all enthusiastic, so I started working on the kinds of materials I wanted to include.
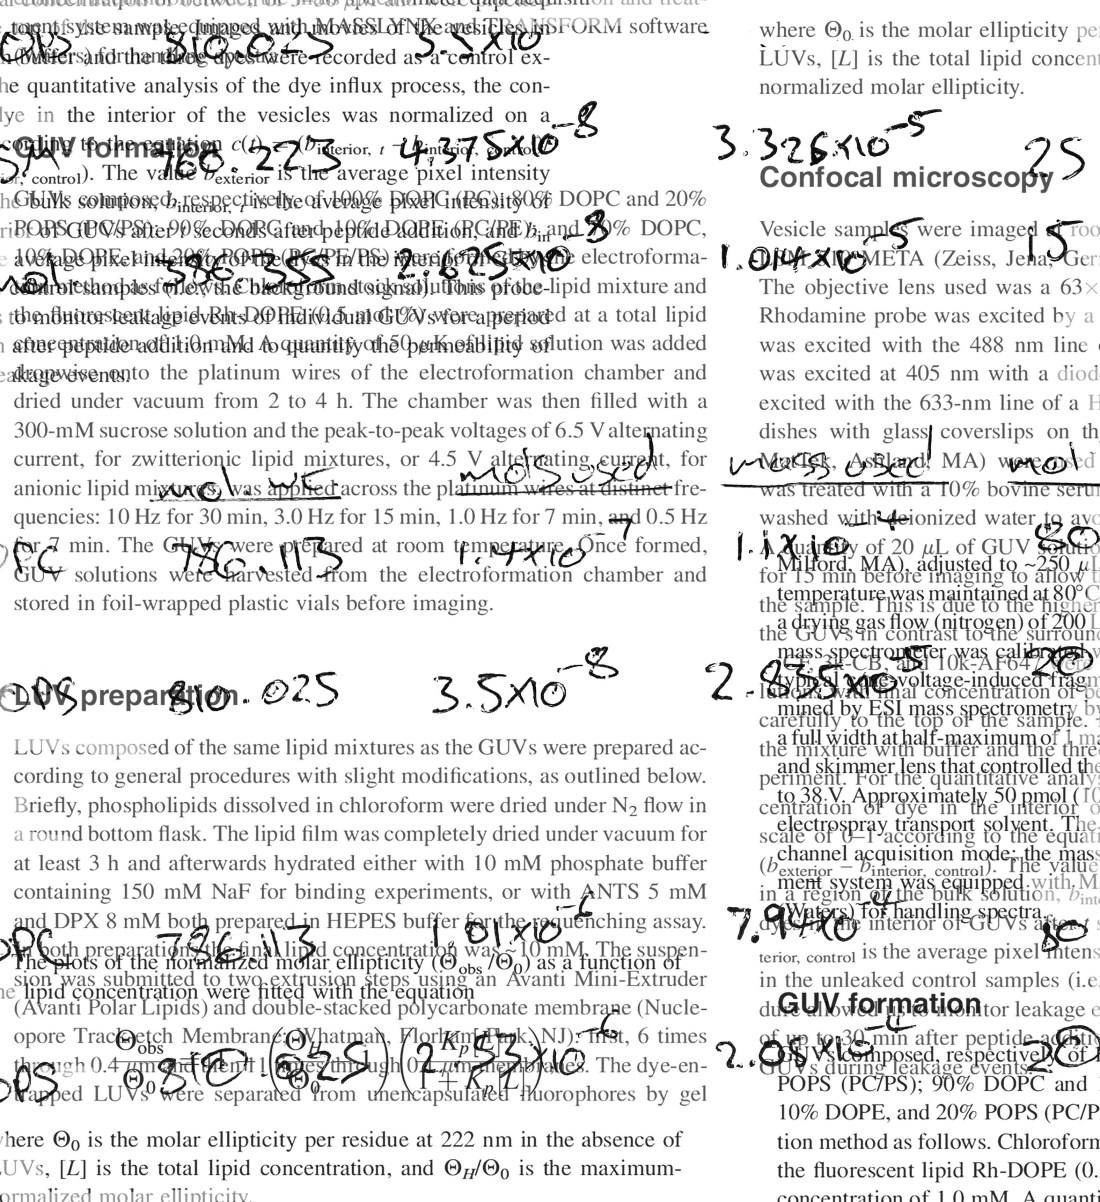
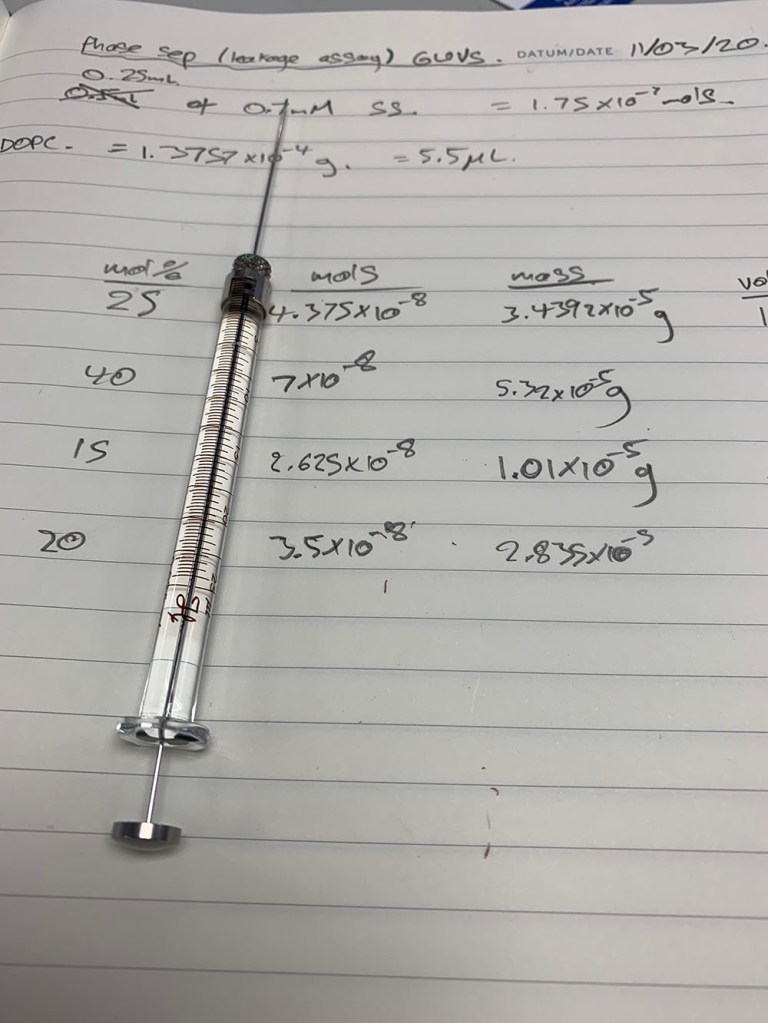
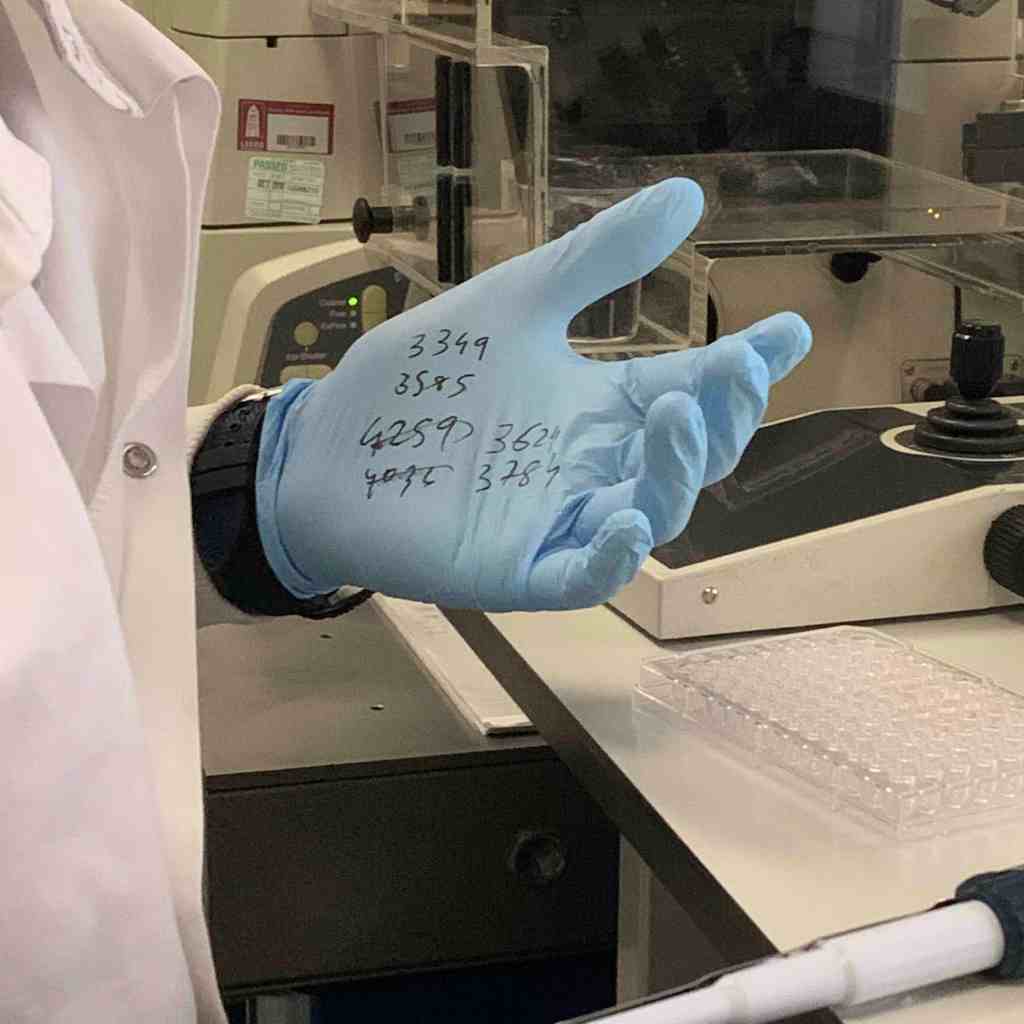
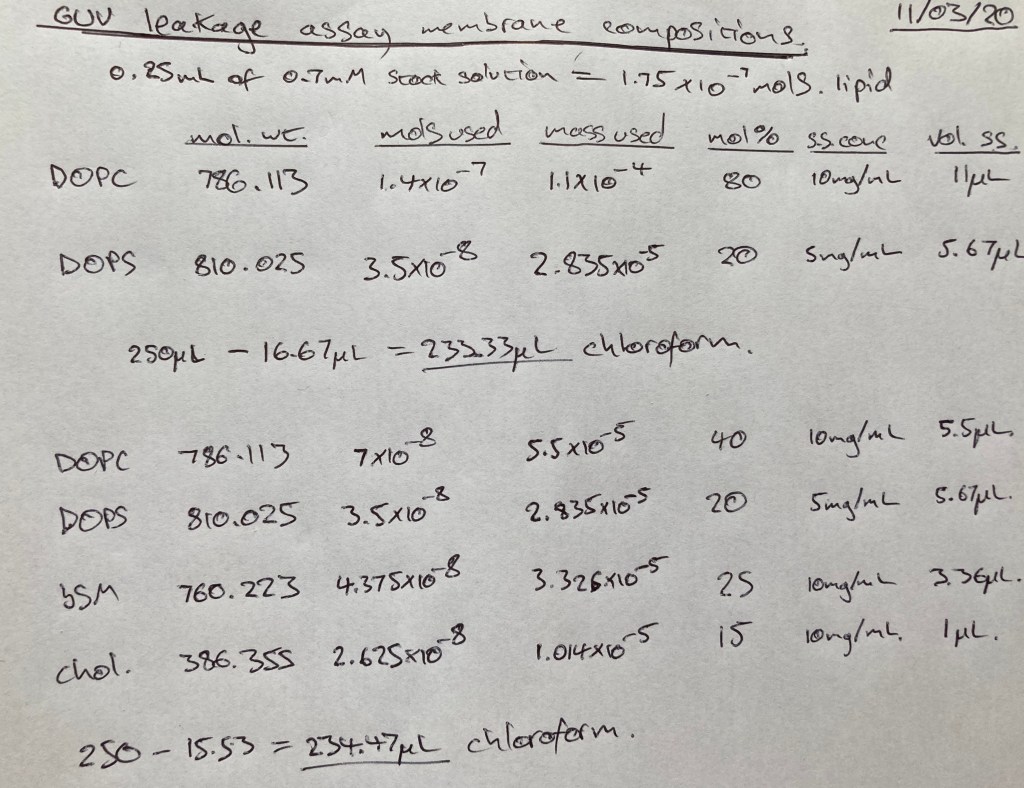
During my visit to the lab, I had been very struck by all the handwritten calculations that formed an active part of the experiments that I was viewing. For me, this not only references an important research activity, but the handwriting also emphasises the human hand involved in the process.
Andrew kindly agreed to provide me with some of his calculations.
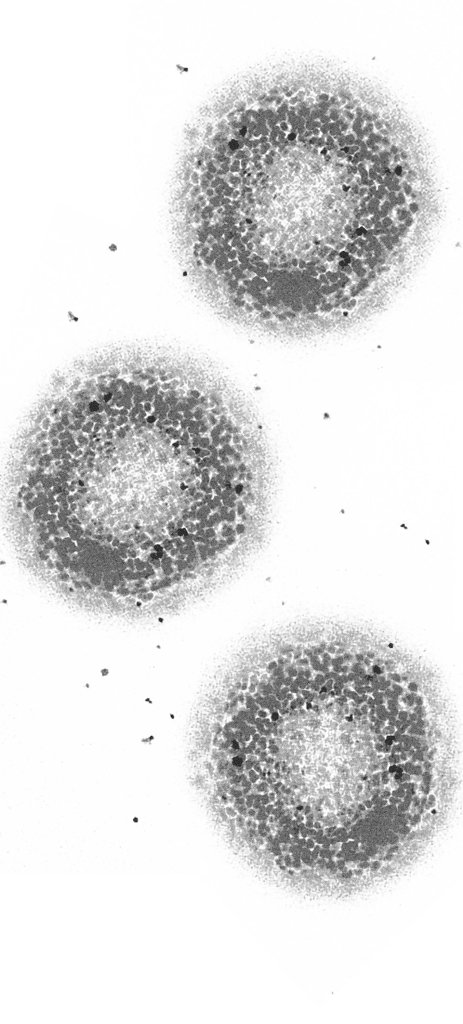
I also wanted to use images of cells that forms a central part of the research, so trawled through a number of different types of microscopic images searching for the ones I thought would work as part of a diorama. My intention was to create a layering of information and data that reflected different parts of the research process and different stages of development of the project.
During various conversations with Paul and Tom we had talked about issues in scientific publishing. This was something I had an awareness of since my involvement with the Royal Society’s Research Culture project that had spawned the Museum of Extraordinary Objects, but it was brought home to me the critical role that science journals play in the dissemination of knowledge, and the complex and – to me – unsavoury considerations that can determine who gets to see the outcomes of research. As an independent researcher I am only too aware of the paywalls that inhibit people’s access to information and the high cost of getting hold of many articles. See this Guardianeditorial if you want to be horrified by the economics of the science publishing industry model.
I was delighted that one of the articles that sets out the initial premises of the project was Open Access (although I was disturbed to learn that academic institutions have to pay publishers to have their articles Open Access). I determined this would form another element of the diorama backdrop.
I discussed with Paul the issues around editing and processing the research images to create the effects that I wanted, and he was sanguine with the images being changed as this was for the purposes of creating an artwork rather than for scientific purposes. So I set about processing the images and ended up with three elements for the backdrop.
The backdrop images were printed and mounted on transparent or translucent acrylic sheets. This mounting would allow different levels of visibility and layering from different angles and under different light conditions…
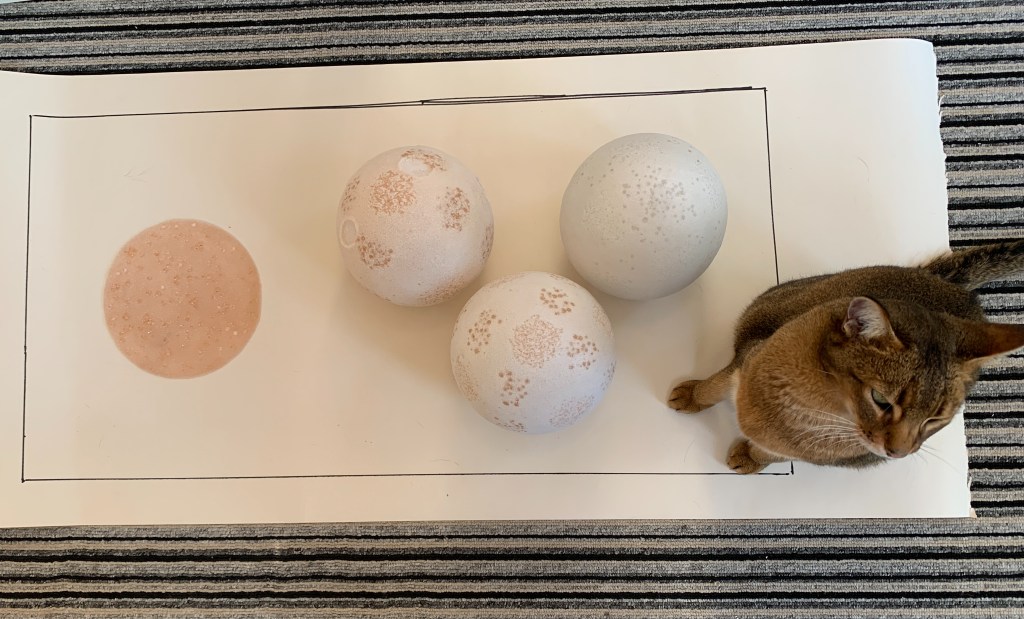
Once the vesicles were underway, one of the major considerations in creating the piece was the relationship between all the different elements. I had already, obviously, committed to creating the ‘vesicles’ and ‘z-stack’ at certain sizes and imagined them situated in relation to each other, but there was still quite a lot to be considered in getting the relationships right. There was also a lot of planning and experimentation in creating the fixings to hold the glass in position.
Mocking up the spacing for the vesicles, with help from my cat Minnow
Once I had a sense of the sizing and spacing, I set to constructing the base and the stands that would hold the glass elements. I was also trying to take into account that the piece would need to travel from my studio to the hospital in Leeds, so my aim was to make the piece so that it could be deconstructed again for transport.
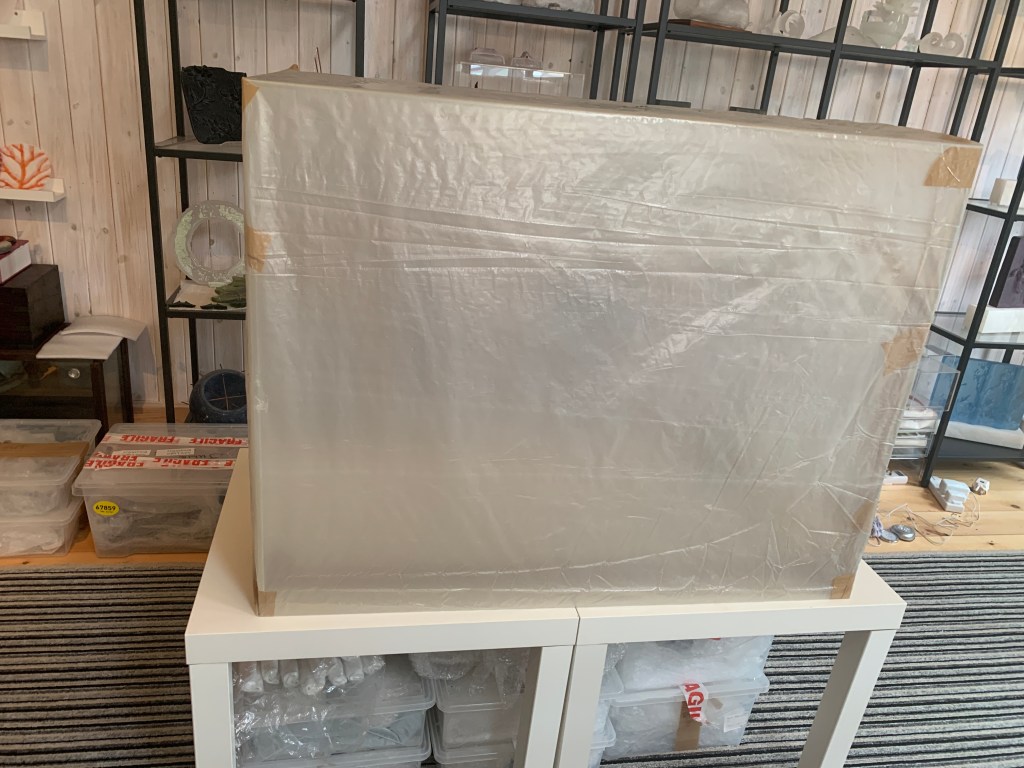
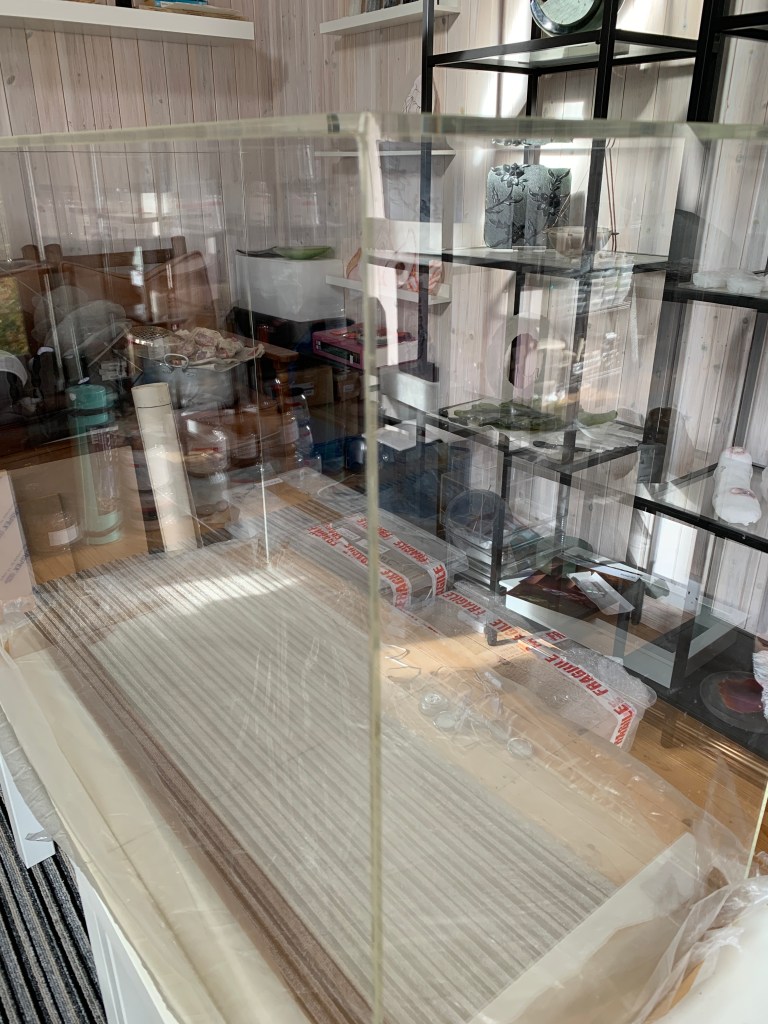
Meanwhile, the case I had ordered to contain the diorama had arrived. This meant that I could make sure that all the measurements I had made were accurate and that the base and the case would fit together properly.
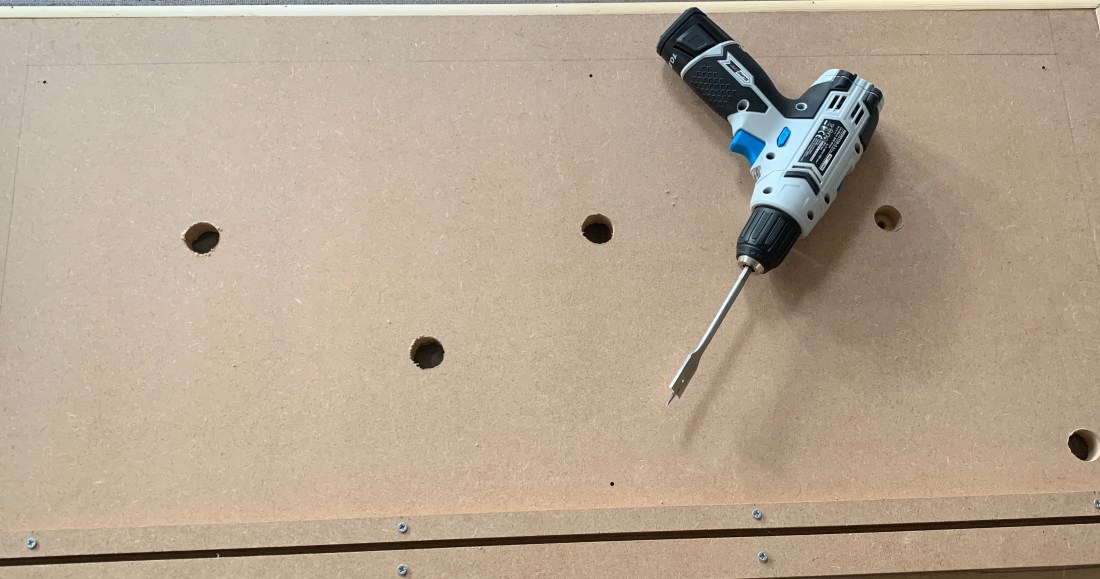
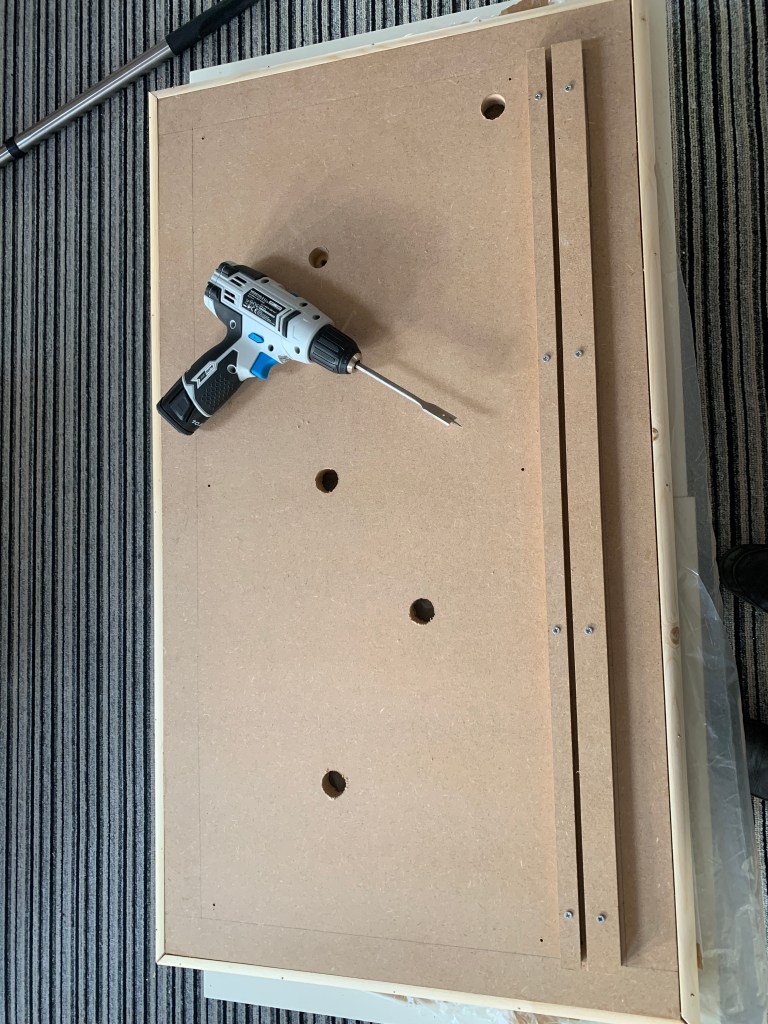
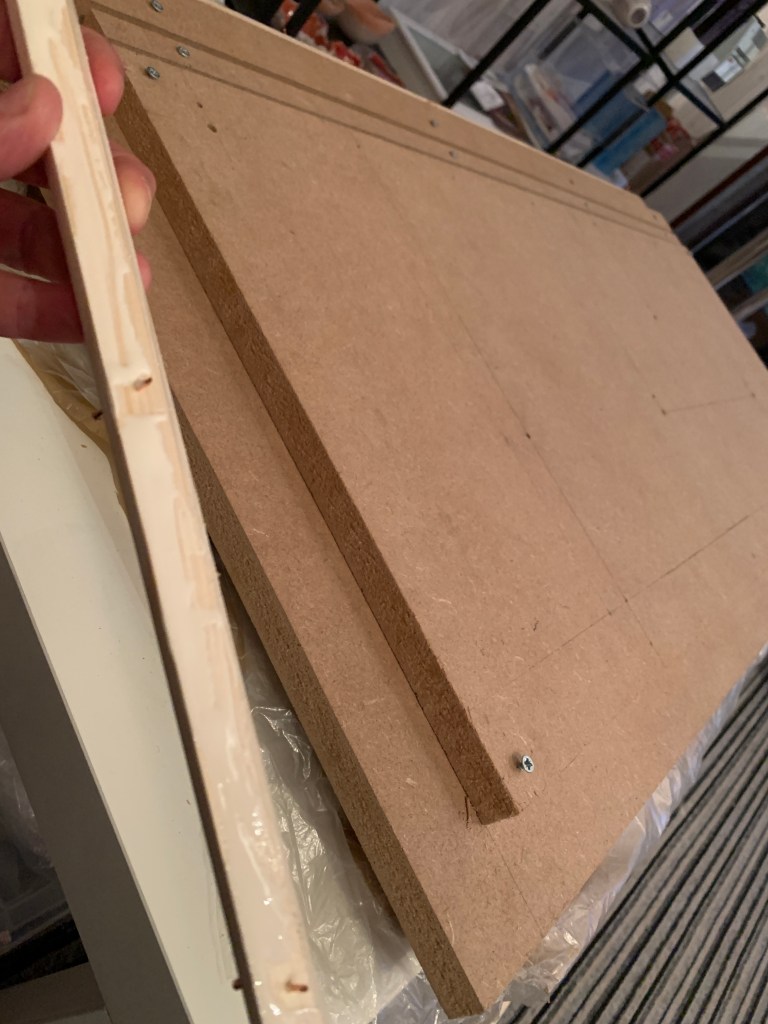
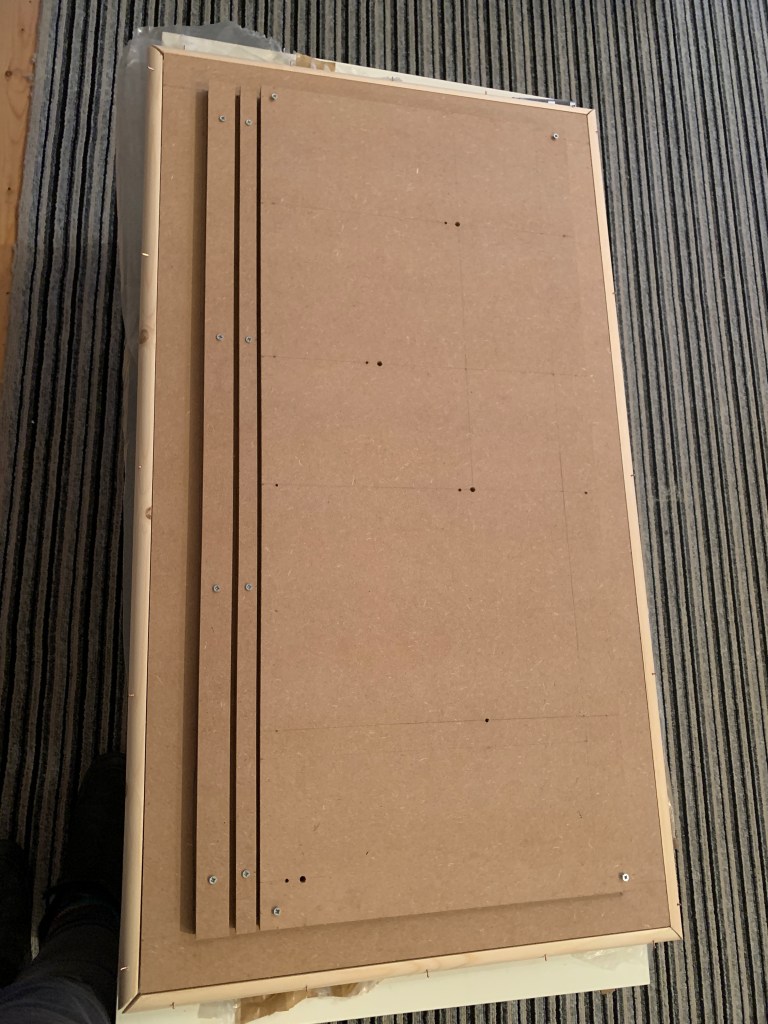
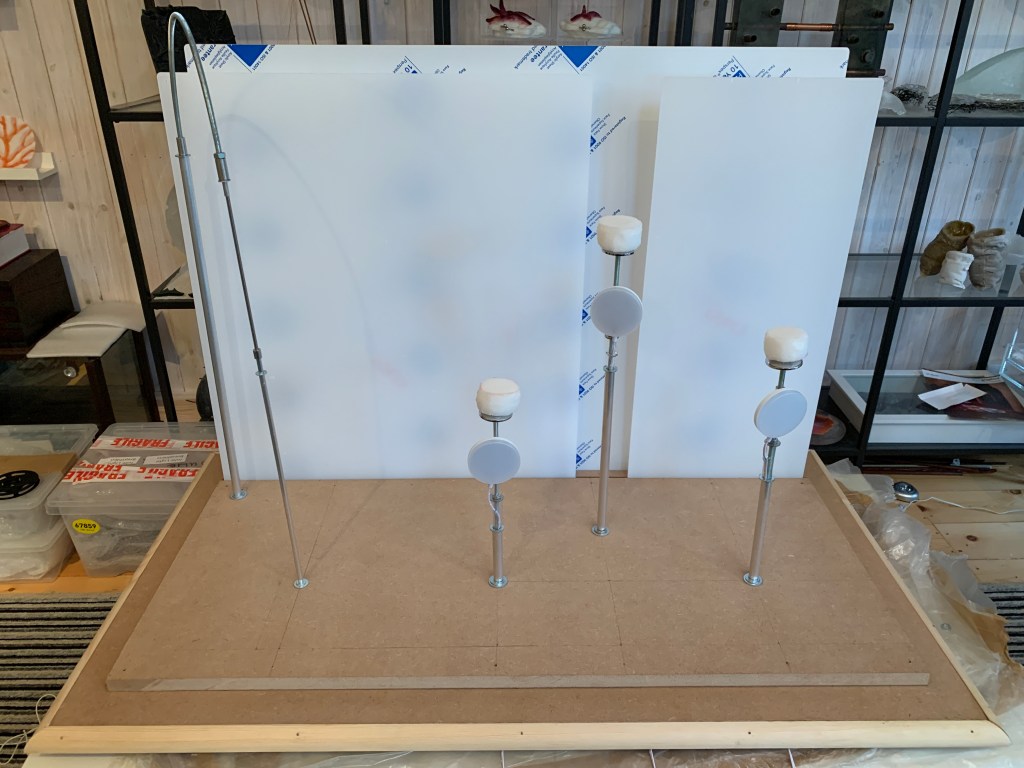
Building the base
The slats at the back of the base would hold the acrylic sheets used to mount the backdrop images. These had to be carefully measured so they would hold the sheets firmly in place.
Eventually the base was built, and I could mount the stands that I had created to hold the glass elements and acrylic sheets. At this stage, I was working with the acrylic sheets still in their protective wrap – that only came off close to completion as acrylic scratches very easily. In fact, the case for the piece has been treated with an anti-abrasive coating to try and minimise exterior scratching, although it can’t prevent it altogether.
And now, all that was left to do was to spray paint the base and mount all the interior elements!